Two-Candle Patterns: Complete Reversal Trading Guide
Master powerful two-candle reversal patterns: engulfing, piercing line, dark cloud cover, and harami for high-probability trades
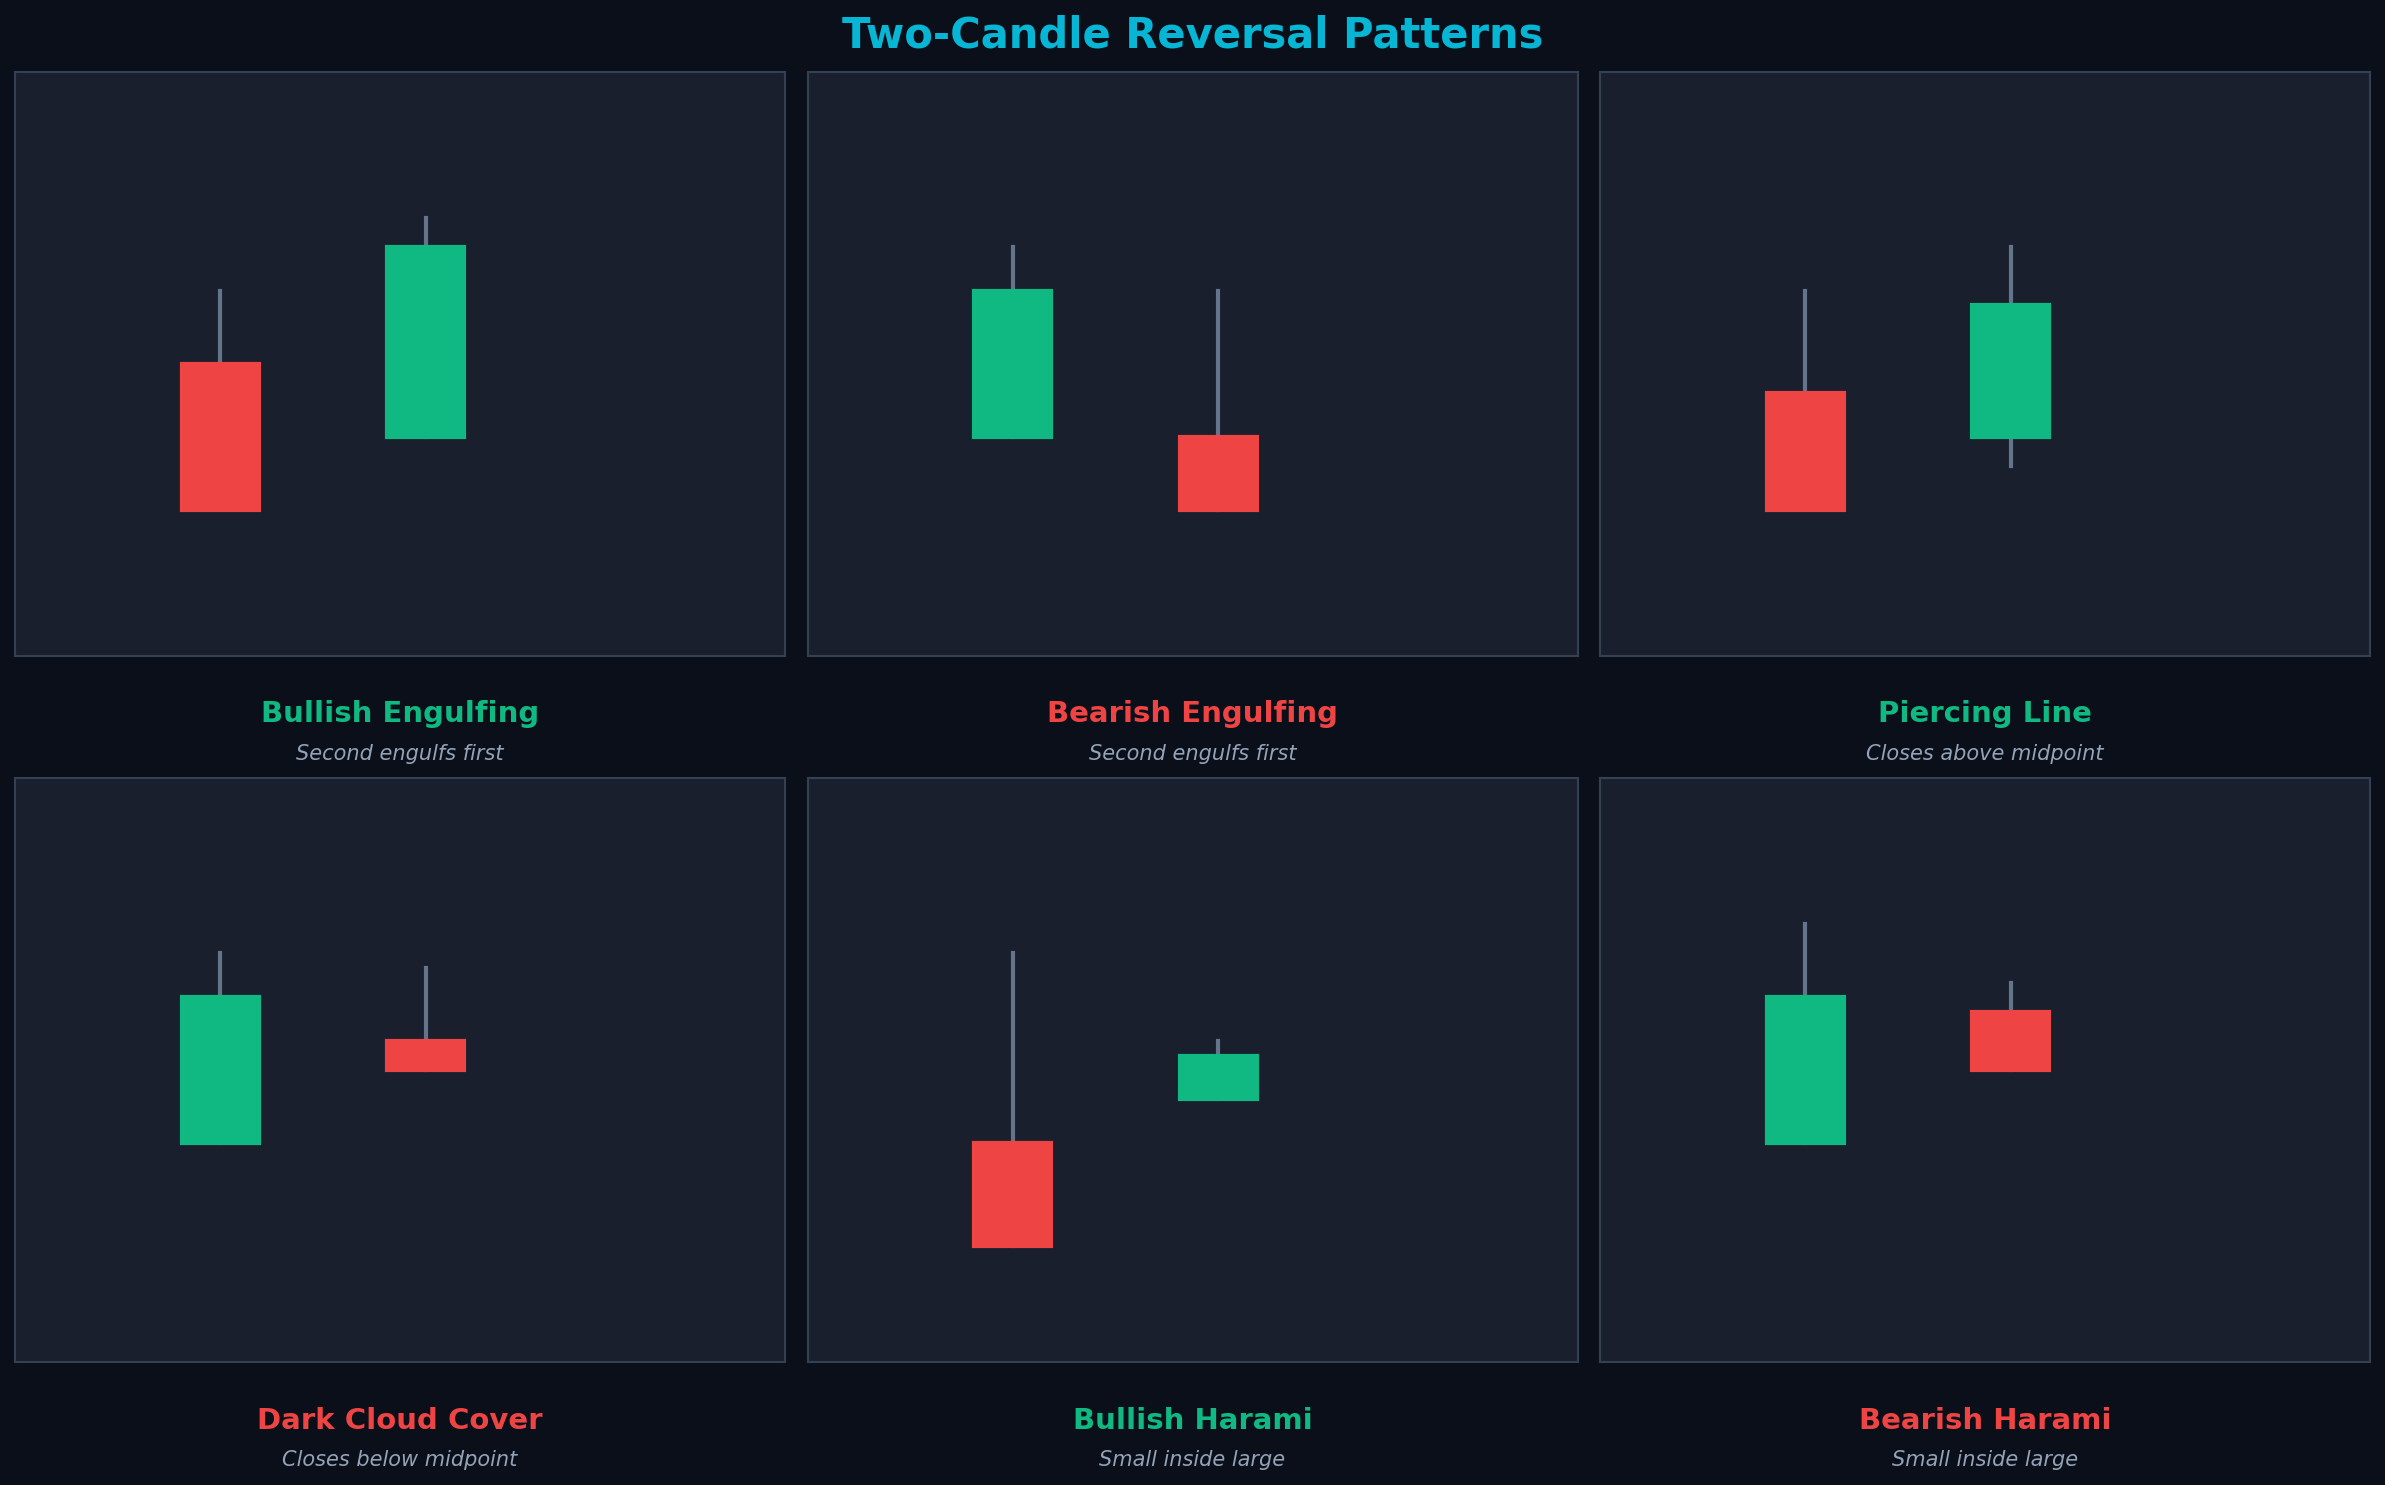
Six essential two-candle patterns for identifying trend reversals
Understanding Two-Candle Patterns
Two-candle patterns are among the most reliable reversal signals in technical analysis. Unlike single-candle patterns that show indecision, two-candle patterns demonstrate a clear shift in momentum from one side to the other. The relationship between the two candles tells a powerful story about changing market dynamics.
These patterns work because they show actual price action confirmation. The first candle represents the existing trend, while the second candle shows the new force taking control. This two-step process provides more reliable signals than single-candle patterns.
💡 Key Principle
Two-candle patterns are most powerful when they appear after extended trends at key support/resistance levels with high volume confirmation.
Bullish Engulfing Pattern
Pattern Characteristics
- Appears after a downtrend
- First candle: Small bearish (red) candle
- Second candle: Large bullish (green) candle
- Second candle's body completely engulfs first candle's body
- Wicks don't need to be engulfed—only the bodies matter
Market Psychology
The bullish engulfing pattern shows a dramatic power shift. The first candle shows sellers still in control, but weakening (small body). The second candle opens lower, giving sellers hope, but then buyers overwhelm them completely, pushing prices far above the previous candle's open. This complete reversal of the prior day's action signals strong buying pressure.
Trading Rules
Best Context: After downtrend at major support level
Entry: Buy at the close of the engulfing candle or on a small pullback
Stop Loss: Below the engulfing candle's low
Target: Recent resistance or 2:1 risk-reward
Volume: Second candle should have higher volume than first
Strength Factors
- Stronger: Larger the engulfing candle relative to first candle
- Stronger: Longer the preceding downtrend
- Stronger: Pattern appears at major support level
- Stronger: Second candle closes near its high
- Stronger: Volume spike on engulfing candle
Bearish Engulfing Pattern
Pattern Characteristics
- Appears after an uptrend
- First candle: Small bullish (green) candle
- Second candle: Large bearish (red) candle
- Second candle's body completely engulfs first candle's body
- Opens above first candle's close, closes below first candle's open
Market Psychology
The bearish engulfing shows buyers losing control. The first candle shows bulls still pushing higher but with weakening momentum (small body). The second candle gaps up, exciting bulls, but then sellers overwhelm the market, pushing prices far below the previous candle's open. This complete reversal signals strong distribution and potential trend change.
Trading Rules
Best Context: After uptrend at major resistance level
Entry: Sell/short at the close of the engulfing candle
Stop Loss: Above the engulfing candle's high
Target: Recent support or 2:1 risk-reward
Volume: High volume confirms strong selling pressure
Piercing Line Pattern
Pattern Characteristics
- Appears after a downtrend
- First candle: Large bearish (red) candle
- Second candle: Bullish (green) candle
- Second candle opens below first candle's low (gap down)
- Second candle closes above the midpoint of first candle's body
- Must penetrate at least 50% of first candle's body
Market Psychology
The piercing line shows a failed breakdown. The first candle confirms the downtrend with strong selling. The second candle gaps down, suggesting continuation, but buyers step in aggressively, pushing prices back up to close above the midpoint of the previous candle. This "piercing" action through the prior candle's body shows buyers rejecting lower prices.
💡 Critical Rule
The second candle MUST close above 50% of the first candle's body. If it closes below the midpoint, it's not a piercing line—it's just a weak bounce.
Trading Rules
Best Context: After downtrend at support with oversold conditions
Entry: Buy when third candle confirms by moving higher
Stop Loss: Below the second candle's low
Target: Recent resistance or 2:1 risk-reward
Ideal: Second candle closes above 75% of first candle's body
Dark Cloud Cover Pattern
Pattern Characteristics
- Appears after an uptrend
- First candle: Large bullish (green) candle
- Second candle: Bearish (red) candle
- Second candle opens above first candle's high (gap up)
- Second candle closes below the midpoint of first candle's body
- Must penetrate at least 50% of first candle's body
Market Psychology
Dark cloud cover shows a failed breakout. The first candle confirms the uptrend with strong buying. The second candle gaps up, exciting bulls, but sellers overwhelm the market, pushing prices back down to close below the midpoint of the previous candle. This "dark cloud" covering the prior rally shows sellers rejecting higher prices.
Trading Rules
Best Context: After uptrend at resistance with overbought conditions
Entry: Sell/short when third candle confirms by moving lower
Stop Loss: Above the second candle's high
Target: Recent support or 2:1 risk-reward
Ideal: Second candle closes below 75% of first candle's body
Bullish Harami Pattern
Pattern Characteristics
- Appears after a downtrend
- First candle: Large bearish (red) candle
- Second candle: Small bullish (green) candle
- Second candle's body is completely inside first candle's body
- Harami means "pregnant" in Japanese (small candle inside large)
- Shows momentum slowing
Market Psychology
The bullish harami shows sellers losing momentum. The first candle shows strong selling pressure with a large bearish body. The second candle opens and closes within the first candle's range, showing sellers couldn't push lower and buyers are starting to defend. This consolidation after a strong move often precedes a reversal.
⚠️ Important
Harami patterns are weaker than engulfing patterns. They show indecision rather than aggressive reversal. Always wait for confirmation before trading.
Trading Rules
Best Context: After extended downtrend at support
Entry: Buy when third candle closes above harami high
Stop Loss: Below the first candle's low
Target: Recent resistance or 1.5:1 risk-reward
Note: Requires strong confirmation—don't rush entry
Bearish Harami Pattern
Pattern Characteristics
- Appears after an uptrend
- First candle: Large bullish (green) candle
- Second candle: Small bearish (red) candle
- Second candle's body is completely inside first candle's body
- Shows buying momentum slowing
- Warning sign of potential reversal
Market Psychology
The bearish harami shows buyers losing momentum. The first candle shows strong buying pressure with a large bullish body. The second candle opens and closes within the first candle's range, showing buyers couldn't push higher and sellers are starting to emerge. This pause after a strong rally often precedes distribution.
Trading Rules
Best Context: After extended uptrend at resistance
Entry: Sell/short when third candle closes below harami low
Stop Loss: Above the first candle's high
Target: Recent support or 1.5:1 risk-reward
Note: Weaker signal—use with other indicators
Pattern Comparison & Reliability
| Pattern | Type | Strength | Confirmation |
|---|---|---|---|
| Bullish Engulfing | Bullish reversal | Very Strong | Minimal needed |
| Bearish Engulfing | Bearish reversal | Very Strong | Minimal needed |
| Piercing Line | Bullish reversal | Strong | Recommended |
| Dark Cloud Cover | Bearish reversal | Strong | Recommended |
| Bullish Harami | Bullish reversal | Moderate | Required |
| Bearish Harami | Bearish reversal | Moderate | Required |
Reliability Ranking
- Engulfing Patterns: 70-80% success rate at key levels with volume
- Piercing Line / Dark Cloud: 60-70% success rate with proper penetration
- Harami Patterns: 50-60% success rate, needs strong confirmation
Advanced Trading Strategies
Strategy 1: Engulfing at Key Levels
Setup: Wait for bullish engulfing at major support that has held 3+ times. Ensure volume on engulfing candle is 50%+ above average.
Entry: Enter at close of engulfing candle or on small pullback to engulfing candle's midpoint.
Stop: 1 ATR below engulfing candle's low.
Target: Previous swing high or 3:1 risk-reward ratio.
Strategy 2: Piercing Line with RSI
Setup: Piercing line forms after downtrend. RSI is oversold (below 30) on first candle, turns up on second candle.
Entry: Buy when third candle closes above piercing line high.
Stop: Below piercing line low.
Edge: Combining oversold RSI with piercing line creates 75%+ win rate.
Strategy 3: Multiple Pattern Confirmation
Setup: Bearish engulfing on daily chart at resistance. Check 4-hour chart for additional bearish pattern.
Confirmation: Both time frames show reversal patterns within same zone.
Entry: Short when 1-hour chart confirms with break below pattern low.
Result: Multi-timeframe alignment significantly increases probability.
Common Mistakes to Avoid
❌ Trading Partial Engulfing
If the second candle doesn't completely engulf the first candle's body, it's not an engulfing pattern. Don't trade weak setups.
❌ Ignoring the 50% Rule
Piercing line and dark cloud cover MUST penetrate at least 50% of the first candle's body. Less penetration = weak signal.
❌ Trading Harami Without Confirmation
Harami patterns show indecision, not reversal. Always wait for the third candle to confirm direction before entering.
❌ Forgetting Trend Context
Bullish patterns need a downtrend to reverse. Bearish patterns need an uptrend. Don't trade reversal patterns in sideways markets.
❌ Neglecting Volume
The reversal candle should have higher volume than the trend candle. Low volume reversals often fail.
❌ Ignoring Support/Resistance
These patterns are 3x more reliable at key price levels. Random patterns in the middle of nowhere have low success rates.
Key Takeaways
- Engulfing patterns are the strongest two-candle reversal signals
- Second candle must completely engulf first candle's body (not wicks)
- Piercing line and dark cloud must penetrate at least 50% of first candle
- Harami patterns show indecision and require strong confirmation
- All patterns need proper trend context to be valid reversal signals
- Volume on reversal candle should exceed trend candle volume
- Patterns at support/resistance levels are significantly more reliable
- Larger the reversal candle relative to trend candle, stronger the signal
- Wait for confirmation on weaker patterns (harami, partial penetration)
- Combine with RSI, moving averages, or other indicators for higher win rates
Conclusion
Two-candle reversal patterns are among the most reliable signals in technical analysis. They show actual momentum shifts rather than just indecision, making them more actionable than single-candle patterns. The engulfing patterns are particularly powerful, often marking major turning points in trends.
The key to success with these patterns is understanding the nuances. A bullish engulfing at major support with high volume is a high-probability trade. A harami in the middle of a range with low volume is a coin flip. Context, confirmation, and volume are what separate profitable pattern trading from random entries.
Master these six patterns through deliberate practice. Study hundreds of historical examples, measure their success rates in different contexts, and develop strict rules for your trading. When combined with proper risk management and support/resistance analysis, two-candle patterns become a powerful edge in your trading arsenal.
Complete your pattern education
Continue to three-candle patterns like morning star and three white soldiers for the most powerful multi-candle reversal signals. Also explore doji patterns for indecision signals.
Continue Learning
Ready to Put This Into Practice?
Join MarketDly to access real-time market insights, AI-powered analysis, and professional trading tools.
No credit card required • Free tier available • Upgrade anytime